
How to clean oxygen sensor without removing it. Engine light on again? Bad gas mileage? Before you spend money replacing your oxygen sensor, I’ll show you two real ways to clean it, without even removing the sensor. So, before we get into the various cleaning methods, let’s talk real quick about what the oxygen sensor actually does and why you might need to clean it.
2 Methods discussed On how to clean oxygen sensor without removing it
If your check engine light is on and you’re dealing with poor fuel economy or sluggish performance, a dirty oxygen sensor might be the cause. This guide explains exactly how to clean your O2 sensor without removing it, using two proven methods: one through the fuel tank with sensor-safe additives, and a more effective vacuum-line method that targets heavier carbon buildup. You’ll learn which method is best for your situation, the tools and cleaners you need, and how to tell if the cleaning worked, all before you spend money on a replacement.
So first, your car’s oxygen sensor monitors the amount of oxygen in the exhaust gases. It sends that information to the engine control unit (ECU), which then uses the reading to adjust the air-fuel ratio in real time, resulting in efficient engine performance and great fuel economy. So, if the sensor is working properly, you get better fuel economy, smoother acceleration, and lower emissions.
But when it’s dirty or clogged with carbon, it starts sending inaccurate readings. Those inaccurate readings throws off the fuel mixture, which then leads to symptoms like:
- 1, Poor gas mileage,
- 2, Rough idling,
- 3, Sluggish throttle response, and
- 4, it could even damage the catalytic converter over time.
Which is like a $400 to $2,000 plus fix or replacement, depending on your vehicle. So, keeping that sensor clean is one of the easiest and best ways to keep your engine running efficiently and avoid unnecessary repair expenses down the road.
METHOD 1: THROUGH THE GAS TANK SENSOR CLEANING
Let’s start with our first and simplest method of cleaning the oxygen sensor.
So, all you need is a fuel system cleaner that’s labeled ‘oxygen sensor-safe.’ Pour it straight into your fuel tank, preferably when it’s about 1/4 full. Then go for a 20 to 30-minute drive, keeping your RPMs between 2,000 and 3,000. That helps the cleaner circulate through the combustion process, improving burn efficiency and gradually cleaning deposits that may affect the oxygen sensor, too.
A Quick Note here.
“Please know that this method is easy, but slow, so it can take a few tanks before you see real results.” “It’s a good maintenance step, but if your sensor is already coated in carbon, you will need something stronger, and I am soon going to show you the second method, which is the most effective method in my opinion.
Now, if you’re going with this first method, make sure you’re using a cleaner that’s actually safe for oxygen sensors and catalytic converters. Some of the best ones out there that I recommend include:
- 1, Chevron Techron Concentrate Plus,
- 2, Royal Purple Max-Clean,
- 3, Gumout Regane Complete Fuel System Cleaner,
- 4, Lucas Deep Clean Fuel System Cleaner, and
- 5, the BG 44K cleaner.
Though these are all general system cleaners but they do a decent job in cleaning the oxygen sensor too. And they are like most trusted brands that won’t damage your sensors or emissions system when used correctly.
But if your sensor is heavily coated in carbon, like the image on the screen right here, and you want somethingmore direct, though not fastest, but will yield the most effective result, then this next method might be exactly what you need. Let’s get into it.
Now, this next method is called the VACUUM CLEANING METHOD, and like I said earlier, this next method might not be the fastest, but it is more effective for a heavily clogged O2 sensor, and it still doesn’t require removing the oxygen sensor in order to clean it.” And just so you know, this works best for the upstream oxygen sensor, the one before the catalytic converter. The downstream sensor, located after the cat, typically won’t get cleaned effectively using this method.
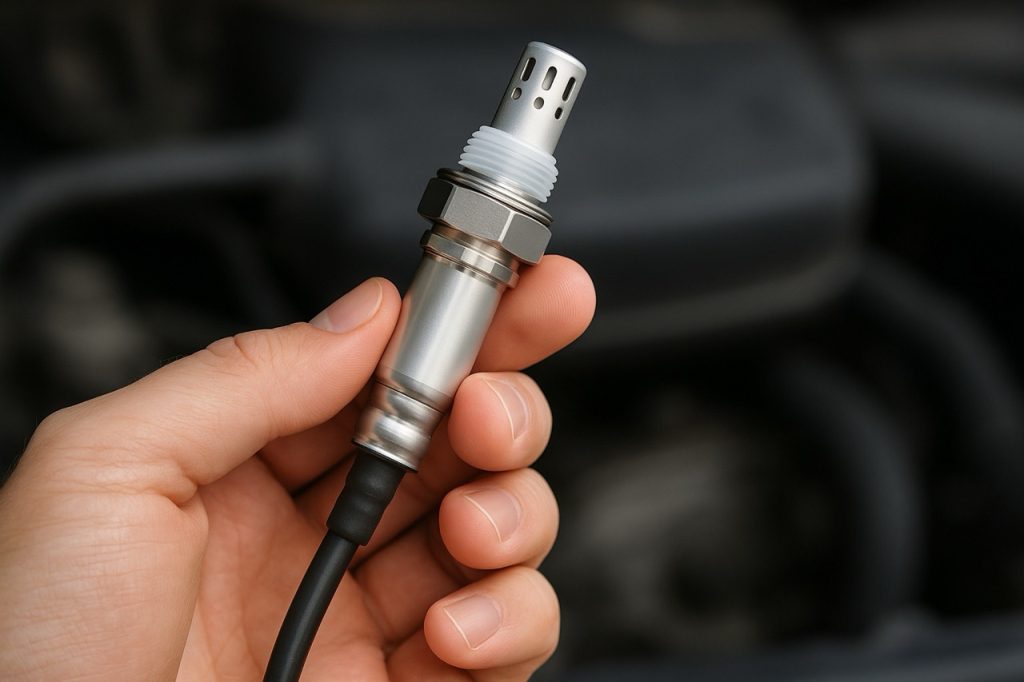
So, I will soon show you exactly how this method works step by step, but first, let’s take a look at the sensor’s condition right now. This is what it looks like
As you can see, it’s coated in black carbon, definitely not how it should look. Now, to be clear, you don’t need to remove the sensor to clean it. I’m only taking it out here so we can compare the before and after. and prove that this method actually works.”
METHOD 2: THE VACUUM CLEANING METHOD
“Here’s what you’ll need:
- A sensor-safe carb cleaner or intake valve cleaner
- A vacuum hose that leads to the intake manifold
- A straw nozzle
- And about 15 minutes of your time.”
Please make sure that whatever cleaner you choose to use is clearly labeled, safe for oxygen sensors and catalytic converters. Avoid traditional carburetor cleaners unless it explicitly says it’s sensor safe; some can be too harsh.
Step 1: Find the Vacuum Line.
“Carefully disconnect one of the small vacuum lines from your intake. This is the one that’ll suck in the cleaner when using the straw, then the cleaner gets pulled into the intake, burned during combustion, and then passes over the oxygen sensor in the exhaust stream, cleaning the sensor tip as it burns off carbon buildup.
Step 2: Insert the Straw into the vacuum line hose.
“Insert the straw directly into the hose, then reconnect the hose so the straw stays in place. Then connect the spray can nozzle to the exposed end of the straw that’s sticking out of the hose. That way, when you spray, the cleaner gets pulled directly into the engine through the vacuum line.
Step 3: Warm Up the Engine.
“Start your car and let it reach operating temperature. Once it’s warm, hold the RPM around 2,000 to keep it from stalling.”
Step 4: Connect the other edge of the straw to the Spray Cleaner bottle.
Now with the engine running, start spraying or pumping the short bursts of cleaner through the straw to the vacuum line.Do this for 30 seconds at a time, then wait, then repeat until you’ve used about half the potion of the cleaner can.”
Quick Tip here: Go slowly because adding too much at once can flood the engine or stall it, so please… go slowly.
Step 5: Rev the Engine & Let it Burn Off.
“After pumping slash spraying, you need to rev the engine a few times. This helps burn away the cleaner and loosen any carbon deposits stuck on the oxygen sensor, thanks to the high heat from combustion.
Step 6: Let the Engine Cool Before Touching Anything.
“Let the engine cool completely before removing the straw or anything, basically, otherwise you will get burned.”Alright, the engine’s cooled down. Now let’s take the sensor out and see if that cleaner really did anything.”
And just look at that, cleaner, brighter, and no more carbon buildup. We didn’t scrub it. We didn’t soak it in chemicals.We just used the engine and the right cleaner, and that’s it.“
Important Notes & When This Won’t Work.
“Now listen, this won’t work or stop any of the symptoms we discussed earlier if the sensor is physically damaged,contaminated with oil or coolant, or giving faulty voltage readings. In that case, you’ll need a full replacement. And we have a article on how to replace it on the channel, and I will link it in the description box below.
But if the sensor is just dirty or clogged, the methods shown above can save you serious money. So to recap, use a fuel additive if you want something quick, and if the sensor is not heavily clogged, and for a heavily dirty O2 sensor, the more effective method is to spray carb cleaner through the vacuum line, and both methods require no sensor removal. And if you want to confirm the cleaning worked, plug in a basic OBD2 scanner and clear the engine light. If the code doesn’t return after driving, chances are the sensor is working properly again.”
Frequently Asked Questions
1.Can I clean both upstream and downstream oxygen sensors using these methods?
Good question. These methods, especially the vacuum line method, are most effective on the upstream oxygen sensor, the one before the catalytic converter.
That’s because it gets exposed to fresh exhaust gases right after combustion.
The downstream sensor is harder to clean this way since it’s positioned after the cat and sees less direct flow.
2. Can I just spray the cleaner directly onto the sensor while it’s still installed?
No, you shouldn’t do that. Spraying directly on the sensor from the outside won’t do much.
It won’t reach the part of the sensor that does the actual reading.
You need to introduce the cleaner through the fuel system or vacuum line so it burns off and passes over the sensor naturally.
3. How do I know if the cleaning worked?
The best way is to clear the check engine light using an OBD2 scanner and drive around for a bit.
If the light stays off and your throttle response or fuel economy improves, the cleaning likely helped. You can also check for stored codes like P0130 or P0171, which often point to sensor-related issues.
4. How often should I clean my oxygen sensor?
There’s no hard rule, but doing a fuel system cleaning every 10,000 TO 15,000 miles as part of your maintenance routine can help keep it in good shape. If you drive in dusty or high-carbon environments, you might want to clean it more often.
5. Will this fix a damaged sensor? Nope. If your sensor is damaged, cracked, or soaked in oil or coolant, cleaning won’t save it. In that case, replacement is your only option.
Related: All About e bike, Types of Electric Bikes, Benefits & How they Work